Sabtu, 29 Desember 2018

Perbedaan Volt, Ampere, Ohm Dan Watt

Perbedaan Volt, Ampere, Ohm Dan Watt 

Perbedaan Volt, Ampere, Ohm Dan Watt | Dalam pembahasan sekarang ini kami akan memberikan informasi kembali mengenai masalah kelistrikan setelah sebelumnya di rumusrumus.com ini juga sudah membahas mengenai rumus hambatan listrik sekarang kami akan memberikan informasi mengenai apa saja sebenarnya perbedaan volt, ampere, ohm, dan watt yang mungkin banyak orang masih belum megnetahuinya apalagi orang awam yang jarang sekali berurusan dengan ilmu listrik ini
Perbedaan Volt, Ampere, Ohm Dan Watt
Sebelum kita membahas mengenai perbedaan secara mendetail anda sekarang ini perlu mengetahui apa itu sebenarnya volt, ampere, ohm dan watt, anda bisa melihat pengertian singkat dibawah ini agar anda bisa lebih paham mengenai istilah dalam dunia kelistrikan ini
Volt
Volt itu adalah satuan besar teganan listrik, didalam lambang internasional ukuran volt ini biasanya di gambarkan dengan lambang V
Ampere
Ampere adalah satuan besar arus listrik yang mengalir dari kutub positif ke kutub negatif
Watt
Watt adalah satuan daya listrik didalam lambang internasional watt dilambangkan dengan huruf W, jadi bisa dinyatakan kalau watt itu adalah satuan besaran listrik yang ada,dan besaran listrik ini dinamakan sebagai voltase
Ohm
Ohm itu adalah satuan hambatan listrik biasanya dilambangkan dengan lambang Ω
Rumus dasar dalam ilmu elektronika adalah: 
current = volt/resistance
Semakin besar hambatan (R/resistance/ohm), maka semakin kecil aliran arus listrik (amps) yang dihasilkan. 
P ==> daya listrik (electrical power) ==> watt
Rumus daya listrik dalam kajian ilmu elektronika:
P = V x IDaya = Tegangan x Arus
Semakin besar tegangan (V/Volt) atau arus (I/Amps) mengakibatkan daya yang besar.

Nah setelah melihat pengertian dari beberapa istilah ini, sekarang kita akam menuju ke kembahasan pokok kita sekarang ini megengenai perbedaan volt ampere, ohm dan watt yang mungkin belum anda ketahui sebelumnya

Perbedaan Volt, Ampere, Ohm Dan Watt

Oke sekarang kita akan ke pembahasan pokok mengenai perbedaannya, untuk lebih mudah mendapatkan penjelasan mari kita aplikasikan sistem listrik ini dalam sebuah pipa air, apabila anda memiliki satu buang toren atau tangki air yang terhubung dengan pipa untuk mengairi rumah, maka jika anda meningkatkan tekanan didalam tangki air anda maka akan membuat air yang keluar menjadi semakin kencang, dan hal ini sebenarnya sama saja dengan sistem di listrik apabila voltase meningkat maka akan membuat listrik semakin kencang juga
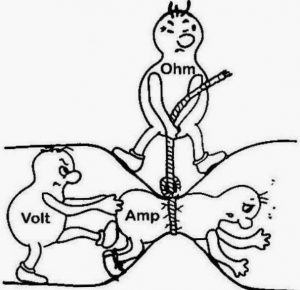
Lalu apabila anda memperbesar diameter selang yang tadi maka yang terjadi adalah akan semakin banyak air yang mengalir di selang tersebut dan hal ini sama saja dengan penurunan resistensi didalam sistem kelistrikan yang bertujuan untuk meningkatkan aliran arus listrik, sekarang anda bisa melihat gambar dibawah ini sebagai ilustrasi bagaimana kinarja volt, ohm, dan ampere
volt ohm ampere
Jadi bisa kita tarik kesimpulan kalau watt itu sama saja  dengan dengan besaran air yang ada dalam toren atau bak penampungan, sedangkan volt itu sama saja dengan tekanan air yang mengalir, sedangkan ampere itu adalah satuan besaran air yang mengalir dari pipa, kemudian ada ohm yang berfungsi untuk menghambat ampere yang mengalir sehingga keluarnya aliran listrik tidak terlalu bersar ketika kebutuhannya sedikit
Nah jadi 4 buah satuan itu berbeda satu sama lain namun memang semuanya salaing bekerja sama dengan baik untuk bisa mengalirkan aliran listrik sesuai dengan kebutuhan yang ada, dan memang ada beberapa rumus yang digunakan untuk menghitung aliran listrik ini seperti rumus hambatanrumus muatan listrik yang sudah kami bahas sebelumnya di situs rumusrumus.com ini.
Senin, 29 Oktober 2018

Modif Solder jdi Blower

https://www.youtube.com/watch?v=XRVBQSW-RiA

Membuat LED JUMMBO

https://www.youtube.com/watch?v=TnhNXWrDu00

Membuat Kipas Angin Tanpa Baling"

https://www.youtube.com/watch?v=_0dGvV9Et3o

DIY LED Lamp for your girlfriend - How to make

DIY LED Lamp for your girlfriend - How to make


  • cara  membengkokkan akrilik
cara gampangny ini

Seputar PCB


  • Software Pembuat Jalur Rangkaian
Anda bingung bagaimana membuat Layout PCB, tak perlu resah ada begitu banyak software yang terintegrasi dalam pembuatan Layout diantaranya ada Proteus, Eagle, dan EWB
software SPRINT LAYOUT 6.0

Minggu, 14 Oktober 2018

HDMI Connector Pinout

HDMI connector pinout

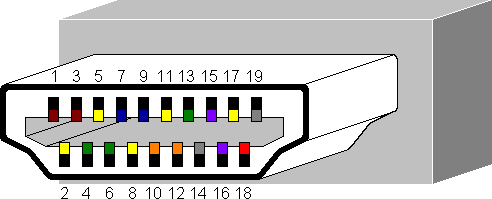
The pin layout of the HDMI interface connector is shown in the figure below.
HDMI connector pinout
PinHDMI 1.0New in HDMI 1.4
1TMDS channel 2 +
2TMDS channel 2 shield
3TMDS channel 2 -
4TMDS channel 1 +
5TMDS channel 1 shield
6TMDS channel 1 -
7TMDS channel 0 +
8TMDS channel 0 shield
9TMDS channel 0 -
10TMDS clock +
11TMDS clock shield
12TMDS clock -
13CEC
14n/cHEC data -
15DDC I²C clock SCL
16DDC I²C data SDA
17DDC/CEC/HEC shield
18+5 VDC power
19Hot Plug DetectHEC data +
web mantap


Senin, 08 Oktober 2018

GOPRO3 FPV VIDEO CABLE DIY

GoPro just released their new Hero3 HD camera lineup, which boasts being 30% smaller, 25% lighter while being able to deliver 1080p in 60 frames per second and even 2.7K in 30FPS .
But while shrinking the camera, GoPro removed the 2.5mm video out jack. But fear not, the GoPro 3 is still able to output the composite video we need for FPV flying. Instead of a normal 5 pin mini USB connector, GoPro chose the much less common 10 pin version. This connector now contains the standard USB pins as well as microphone input and the video output.
Unfortunately it’s not as straight forward as simply soldering the cable to the connector. A 100K ohm resistor is also needed to kick the camera into video out mode. In this guide I’ll guide you through making your own cable, so that you too can enjoy the live output of this great camera, without having to dish out 20$ for a bulky cable from GoPro.
First off you need to get your hands on a 10 pin mini USB connector. They can be found on various electronic stores online. I ordered mine here. You also need a 100K resistor. Any watt rating will do, as there will only be microamps going through it. I used a standard thru-hole 1/4W resistor I had laying around. It’s a little big so if you need to order the resistor I recommend getting a smaller one, like a 1/8W. You also need a cable of some sort. I used a 32 AWG servo lead, which is nice and thin.
This is how we’re going to connect everything.
I removed the unused pins to gain more space, reduce the chance of a short and make it easier to work on.
I soldered the cables first, which I think is a good move as they are the most fiddly. Do not use to much heat on the soldering iron or the connector and/or the insulation on the wires will melt.
The resistor is connected between pin 7 (the ID pin) and ground. This is how I mounted my resistor. The metal case of the connector is connected to ground inside of the GoPro Hero3, but if you wanted you could connect it to the video ground pin instead. Connecting it to the case does make it very sturdy though and there is no chance of it shifting around.
Pretty compact considering the size of the resistor.
I wanted my connector to stick out as little as possible, so I bent the wires 90° back over the resistor.
Yay! It works! Time to make the cable robust.
To make the cable as though as possible I decided to use “InstaMorph”, which is a plastic that after it’s been heated up can be shaped and molded into almost any shape. Once cooled of it becomes incredible hard and very though. Check out Chads excellent video showing how to use “InstaMorph”
Instamorph is awesome.
Pretty streamlined but still easy to grab and pull out.
Time to paint it.
The paint sticks well to the Instamorph. Our DIY analog video cable looks great!
Done! Works like a charm, low weight, robust and easy to plug in and out. What more could ask for?
Here is the DIY cable vs the original GoPro cable.
Much more streamlined!
Now get out there and make awesome FPV videos using your new GoPro3 video out cable!
The GoPro Hero 3 is available in a view different models find out more here

Alat Untuk Koneksi ActionCam ke FPV


  1. F08820 Aerial FPV Micro HDMI to AV Analog


  1. FPV Mini HDMI to AV Converter Board


  1. Aerial FPV HDMI to AV Analog Signal Converter for SONY A7 OR GH3 4 5D
  1. eachine light l250


  • Karena HDMI itu digital sedangkan AV itu analog jdi perlu di ubah dri HDMI ke AV untuk bisa konek ke receiver FPV
  • video:


Frame Drone Moka

Frame Drone Dari MOKA


Specifications
  • Weight: 142g
  • Wheelbase: 250mm (diagonal motor to motor) and can adjust to 290mm to fit big prop
  • Material: 3K weave carbon fiber
  • arm 16mm tube compatible with all motor mount in the market (TAROT)
  • damping mount for mobius camera
  • Motors can tilt for fast forward
  • Motors can slide to change dimension from 250mm to 290mm
  • support 5,  6 and 7 inch prop
  • camera protected in frame
  • arms are foldable to absorb the impact in the event of a crash
  • using tube is good for airflow and increase efficiency of motors
  • tube arm 4 time strong than basic arm
Recommended Setup
  • 2204-2208 size motors with M3 16x19mm mounting pattern
  • 5-6” props
  • 3-4S power, 1300-1600mAh capacity batteries
  • Mini CCD camera with tilt bracket and 600TVL
  • Naze32 or cc3d
  • slim ESCs fit perfect in tube 16mm ( DYS Blheli 20A
Link Moka:
http://mokaframe.com/moka-foldable/